Overview
The markings
Brief information about the markings, which can be seen in this documentation, as well as in other parts of this site.
- Hover over this icon to see a short description or the details on a particular topic.
- WIP The function or element marked with this icon is experimental, that is its operation is probably incomplete and requires improvements or it will be completly changed.
About the project
The aim of this project is to create a platform that will allow:
- Collecting data and analyzing them on various forms of presentation.
- Responding to incoming data automatically using previously configured services. Services can operate on raw or filtered and processed data, what can be achieved using the Format and Filter (more about them here).
- Creating tasks for execution at specific times of the day in a cyclical manner or just once.
The project is designed for Lan Kontroler v3, which supports communication protocol MQTT. It consists of multiple modules, among which can be distinguished several major:
- The MQTT server with division of the pool of topics for many users.
- "Worker" module that is linking MQTT topics with various available services.
- Web server for configuring the "worker" module and retrieving the collected data.
About MQTT
General
MQTT is a Client Server publish/subscribe messaging transport protocol that runs over TCP/IP. It is light weight and therefore is ideal for use in constrained enviroments.
Clients can:
- Subscribe to topic - they request the server to send them incoming messages from the chosen topic.
- Unsubscribe from topic - means that they inform the server about the fact that they no longer wish to receive messages from the selected topic.
- Publish message - send a message on chosen topic to server, which then sends out a message to all interested customers (subscribers of the topic).
Topics
Topic can be imagined as channel, which clients can observe to see its content (subscribe) or put something inside it (publish). It is worth noting that subscription topic differs from publish topic, as they may contain special characters. With the help of these characters it is possible to receive messages from multiple "common" topics with a single subscription.
Before explaining which characters are special and what actually can do, it's necessary to mention that the topics form a hierarchy. That means they are built of hierarchy levels, separated with character /. Special characters make use of hierachical structure of topics, and precisely they make that one topic may contain many other topics. They have been presented below:
- + - it covers one level and must be the only character on this level. As a result, topics that have a different character combinations in place of + will contain in a subscription with special character. In other words it means so much that in place of + you can insert any value. For example: topics like a/b/c/d, a/b/e/d matches subscription a/b/+/d but topics a/b/c or a/b/c/d/e do not.
- # - it covers multiple levels but must be the last character in whole subscription topic. This sign will match any other characters or even multiple levels, eg. topic subscription a/# matches a/b, a/b/c, but not b/c.
Both special signs (+ and #) can be used together in one topic subscription, eg. a/+/c/# which matches a/b/c/d, a/d/c/f.
Our server
As a MQTT server we use Mosquitto (more about it here). It listens on few ports:
- 1883 - without encryption, requires authentication
- 8883 - with SSL, requires authentication
- 9001 - WebSockets without encryption, requires authentication
- 9002 - WebSockets with SSL, requires authentication
More
You can find more detailed information about MQTT protocol at:
Devices
We will refer to LK3, GSM Controller and other devices that can connect with our server via MQTT, simply as devices. In this section you will find informations about adding new device to your account, configuring it, editing it's server-side settings and more.
Devices page
Devices page is the central point of the site where you can manage devices. It's where you can add new devices, view already added ones and delete them. You can also find links to edition pages, chart and table views for your devices.
The image below shows Devices page on account with few devices. Here you can distinguish the following elements:
- List of devices assigned to account. It contains names, types, prefixes, links to edition pages, chart and table views.
- Instruction on how to add and configure new device.
- Form for adding new device. It's worth mentioning that using redirect will result in moving user to Series settings page, which should be visited to choose active series.
- Links to edition pages mentioned before. There also is function to delete chosen device from account.
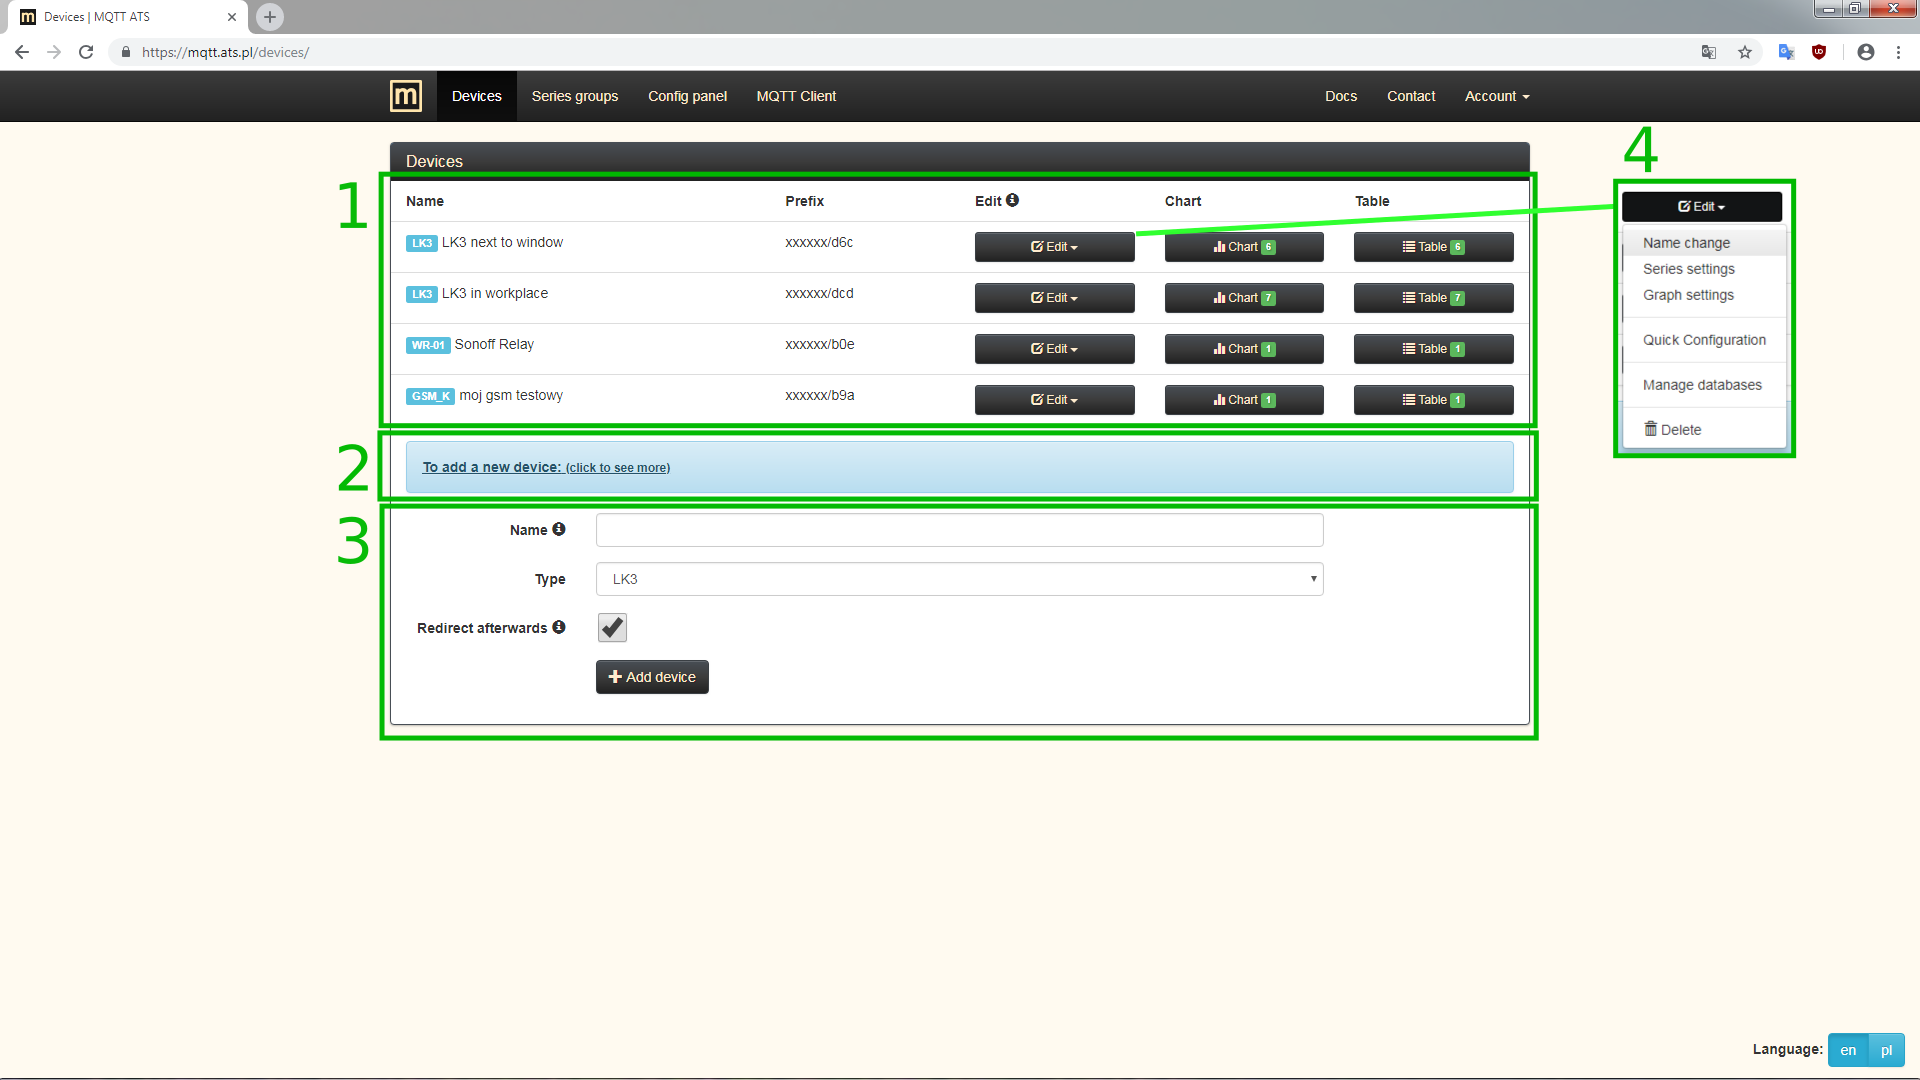
Devices page
Adding
First step to start using the service is adding a new device to your account.
- Begin with signing in with your account.
- Go to Devices page where device addition form is available (shown in previous section Devices page).
- Complete the form.
- Confirm with button Add device and wait until you are redirected and are shown results (success or errors message).
- Choose data/series that interest you in Series settings inside Edit section.
-
Configure your device's MQTT client settings. There are 2 ways to do it for LK3.
- Recommended for LK3 Use Quick Configuration from Edit section (details on its page).
-
Manually enter data in form in LK3's MQTT Client tab:
- Enable Mqtt
- select it
- Enable log/pass auth
- select it
- Server address
- copy value from short instruction on Devices page and paste
- Port
- copy value from short instruction on Devices page and paste
- Login
- copy value from short instruction on Devices page and paste
- Password
- copy value from short instruction on Devices page and paste Note it's not your account's password
- Prefix
- copy value of prefix generated for chosen device
- Time
- leave the default value or enter 300
- Ping Time
- leave the default value
Select at least one checkbox so LK3 will be actually sending data.
Approve changes by clicking Save.
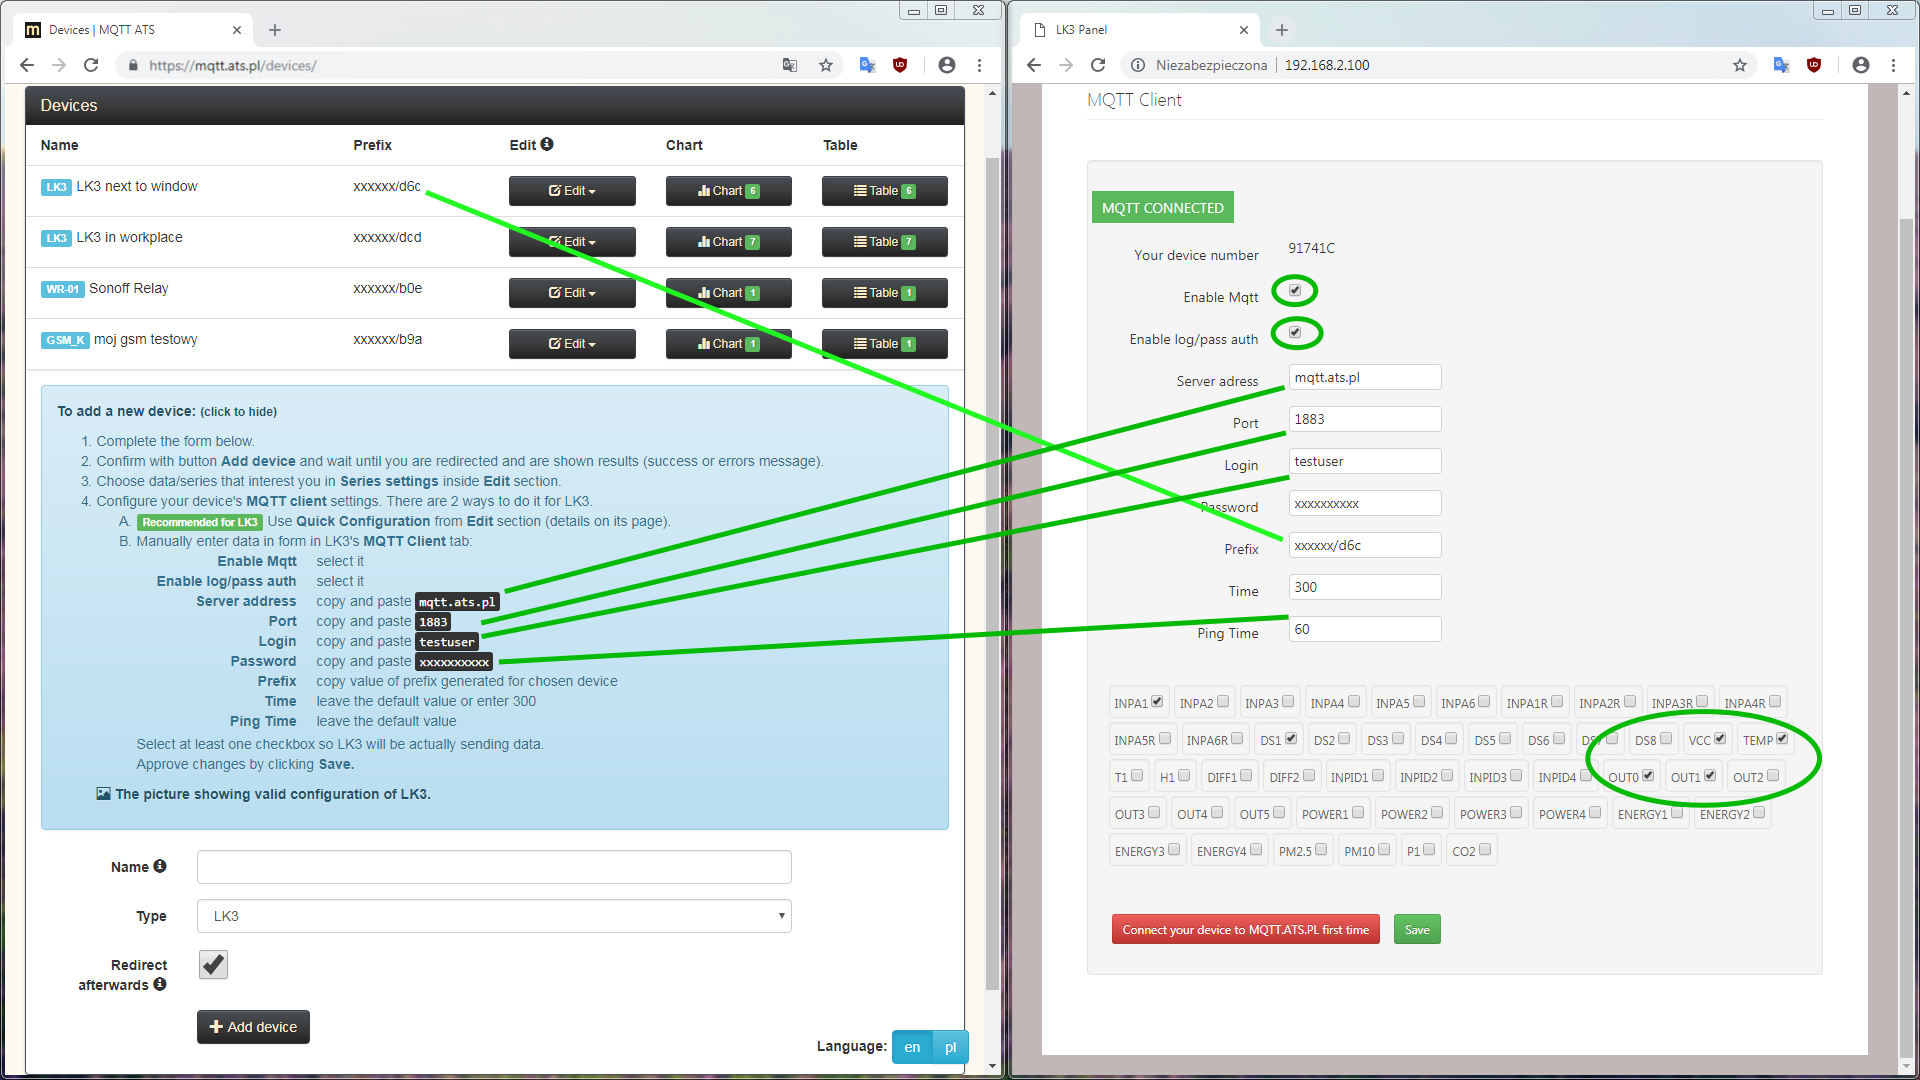
LK3 configuration
Afterwards LK3 should start sending data, which you can observe in Chart view for this device. Generally first data should arrive in about 5 minutes since configuration of device.
Troubleshooting LK3 configuration
If you have configured your device and waited for at least 5 mins for data in Chart view and didn't see any messages coming in then something is wrong. To learn what could have gone wrong and how to fix it keep reading.
First start with few checks:
Is there 'MQTT connected' message in MQTT client tab (on device's page), like in the image above (if there isn't any status message then it's recommended to upgrade firmware to newer version to have this feature)?
- Yes - The problem is in MQTT Client configuration on device.
- No - The problem is in Network configuration or MQTT Client configuration on device.
Can device fetch time via NTP (Time tab on device) with default settings (pool.ntp.org:123)?
- Yes - The problem is in MQTT Client configuration on device.
- No - The problem is in Network configuration on device.
Solutions:
- Network configuration - For static configuration make sure to enter valid IP address, gateway and DNS (8.8.8.8 can be used as primary DNS). If you are not sure of those values then use DHCP, but remember that you will have to find your device's new IP address to access it (leases in DHCP Server section in most routers).
- MQTT Client configuration - The easiest and the fastest solution is using Quick Configuration, mentioned in configuration section. If for some reason you can't use it, then carefully go through manual configuration procedure described at the beginning of this section. Make sure there is no extra trailing spaces in any of the fields (especially Password and Prefix).
The above issues are the most common ones, but there might be problems caused by external factors, e.g. restrictive firewall blocking outgoing data.
Configuration
After adding a device to your account you will be able to configure some options for it (mentioned in Devices page section). Below is short description of available settings and device related management functions, available in Edit section.
- Name change - You can change device's name. It might be a good idea to use descriptive names to easily distinguish your devices.
- Series settings - Select active series, that is series that should be available in chart and table views. Also change their names and styles. Preview of this page.
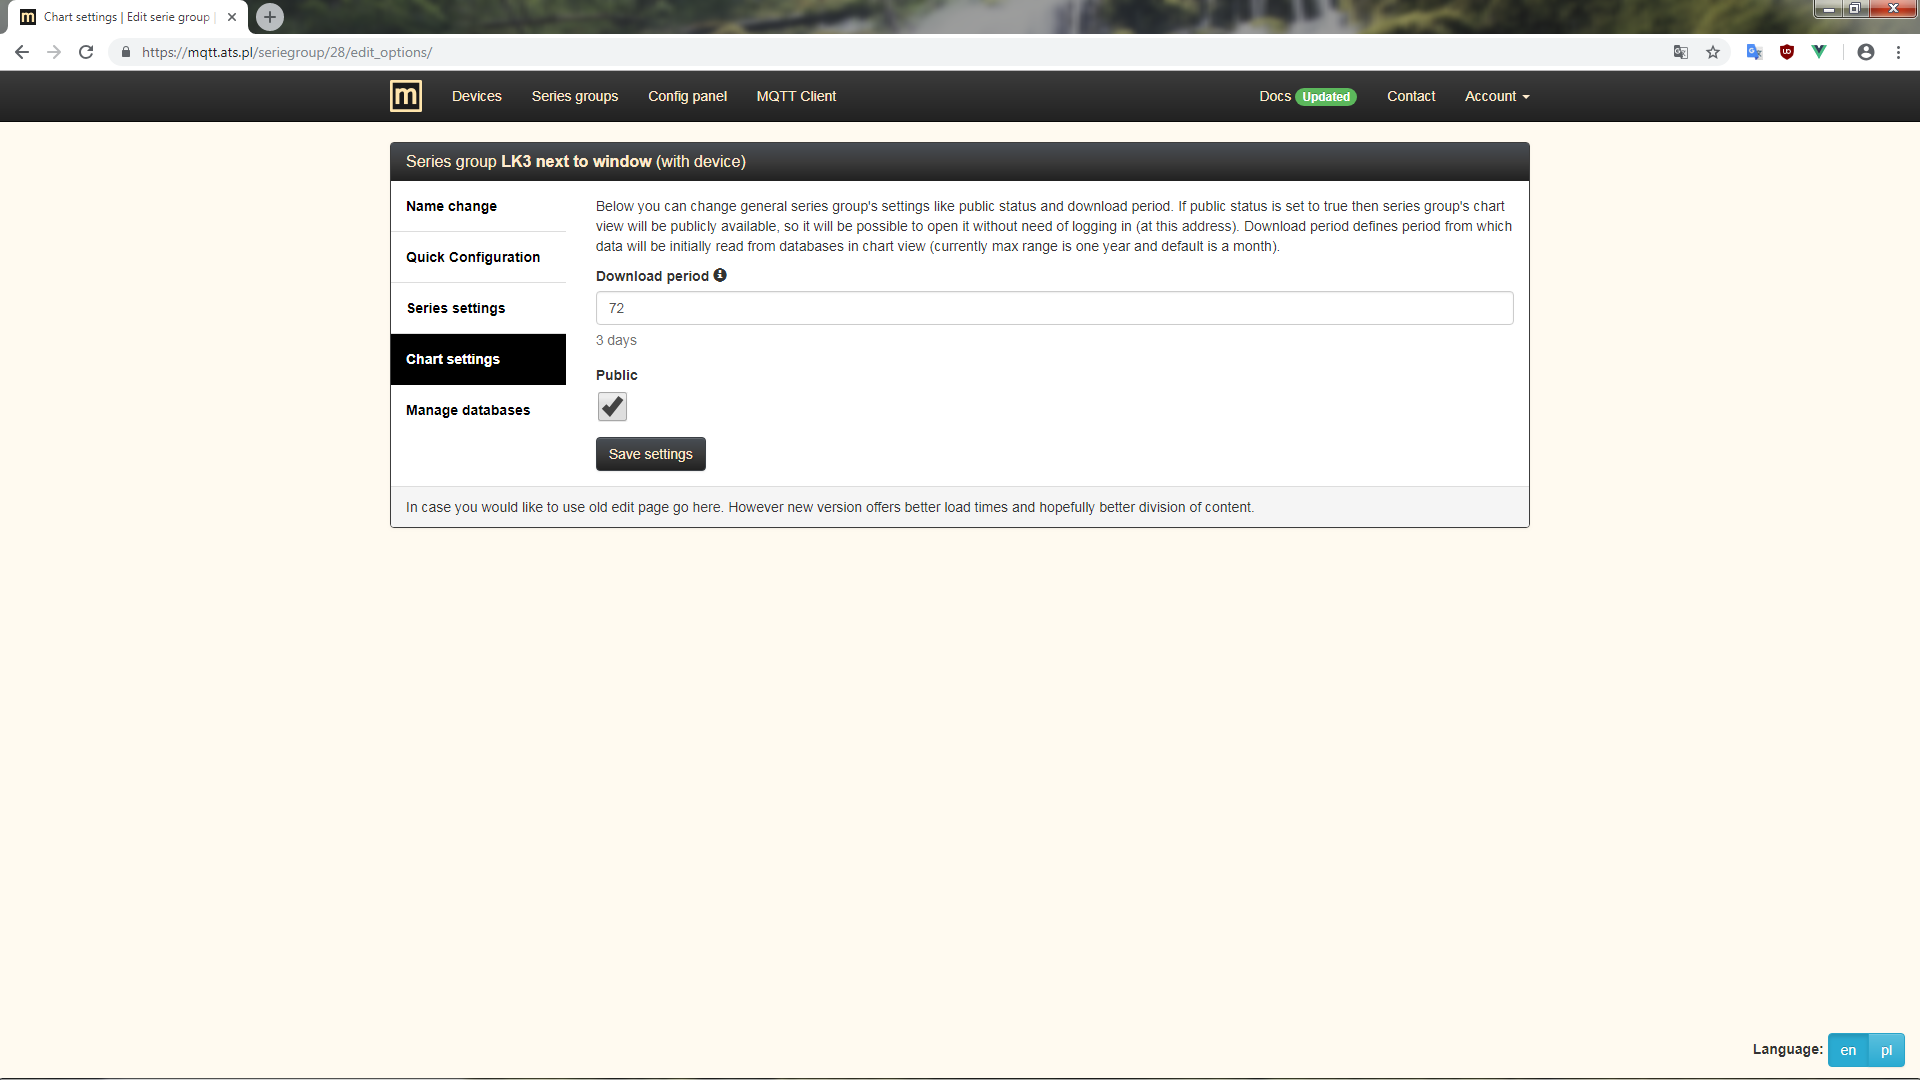
- Chart settings - Select period of time from which data should be displayed in chart view and also whether it should be accessible publicly. Preview of page.
- Quick Configuration - Function that helps configuring LK3 for connecting with server. Recommended instead of manual configuration because it's way faster and prevents common mistakes like typos or copying wrong value. Preview of page.
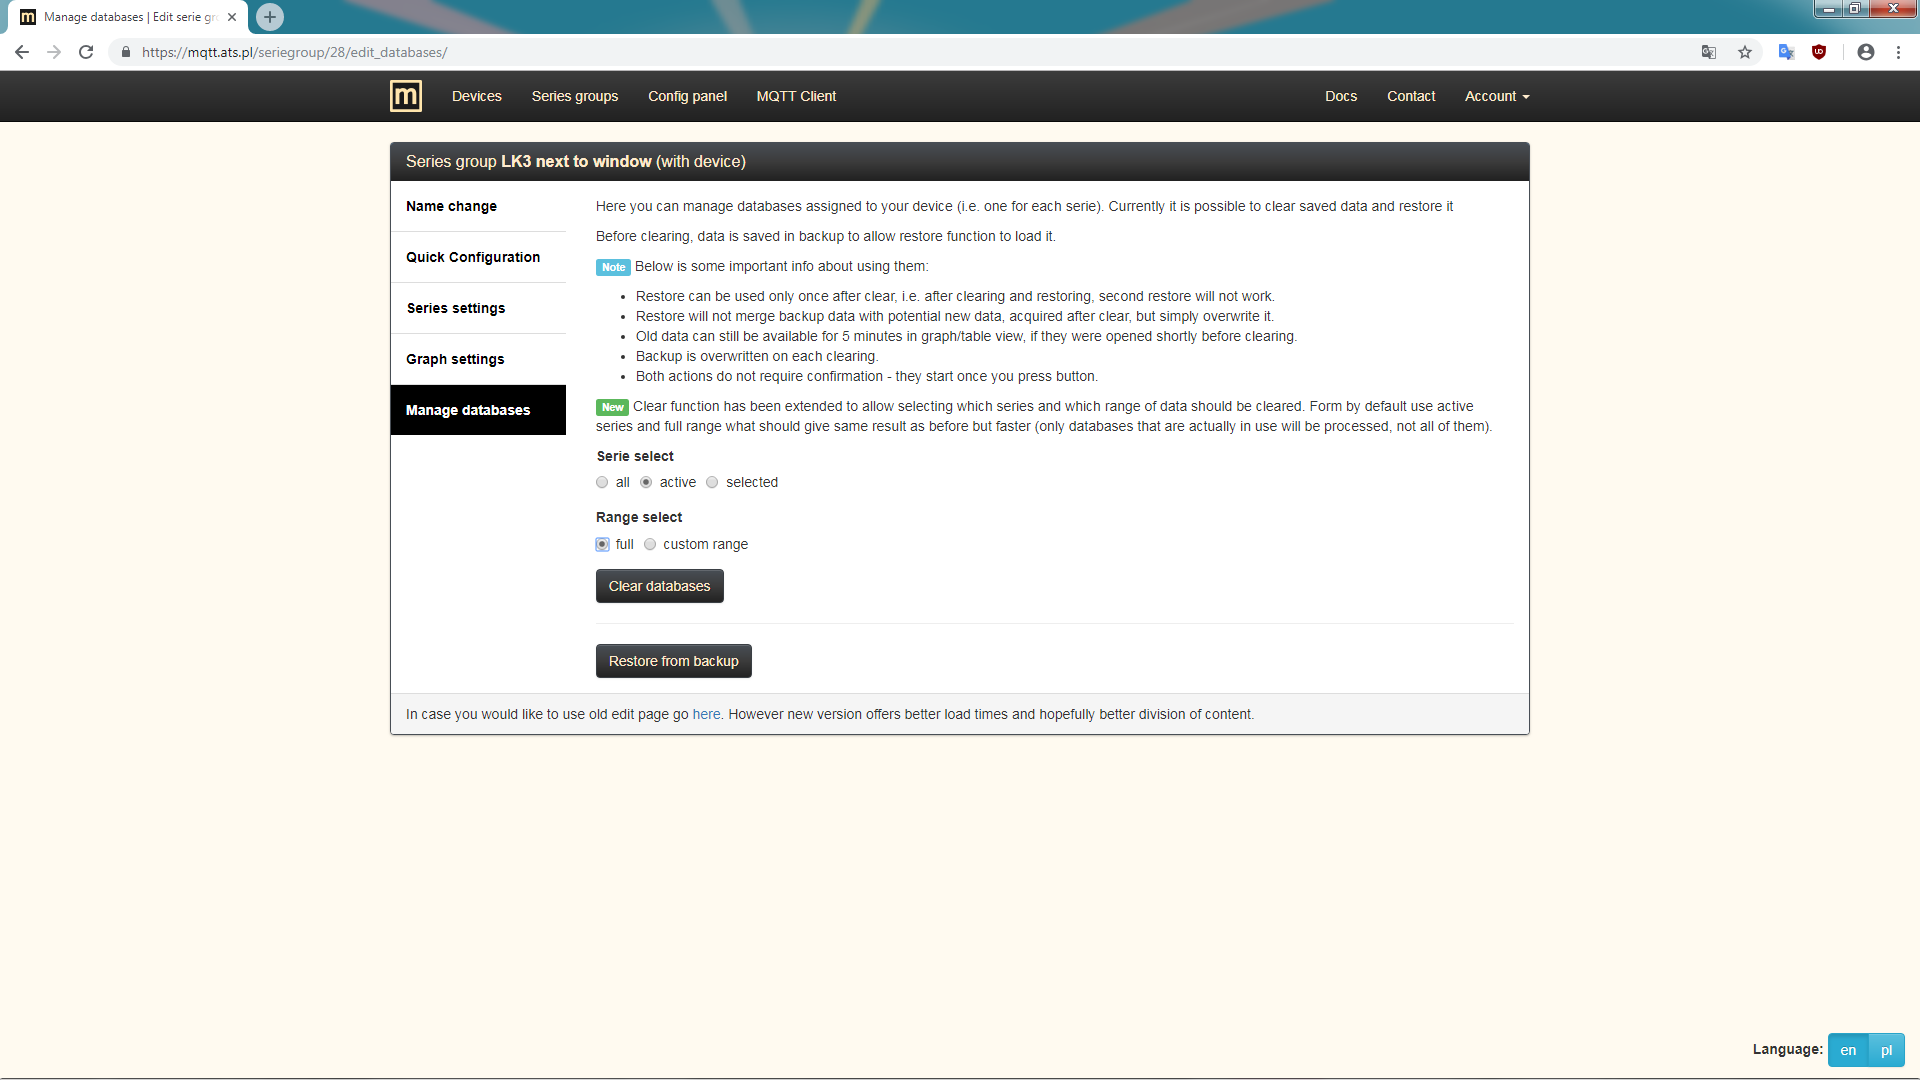
- Manage databases - You can clear databases for your device, partially or completely, for one or few chosen series or even all of them. Preview of page.
- Delete - You can delete device from your account, with all of its databases.
Controlling
You can control your devices remotely as long as they are connected to our MQTT server. Currently (in ver 1.49) you can send commands to your LK3 to turn on/off output or pwm, to change pwm frequency and duty cycle.
Following example/instruction shows how to send commands to your device (here to LK3), using MQTT Client page.
- Subscribe to /cmd and /cmdr topics for your device (its prefix + /cmd). Topic /cmd is the one to which commands should be send and /cmdr is the one to which LK3 sends confirmation that it processed command.
- Choose topic /cmd in the Publish section (the same one from previous step). Type a command into Message field, eg. out0=0 or out0=1, and send it with the Publish button.
- In result, messages you have sent to topic /cmd and responses from /cmdr should appear in Messages section.
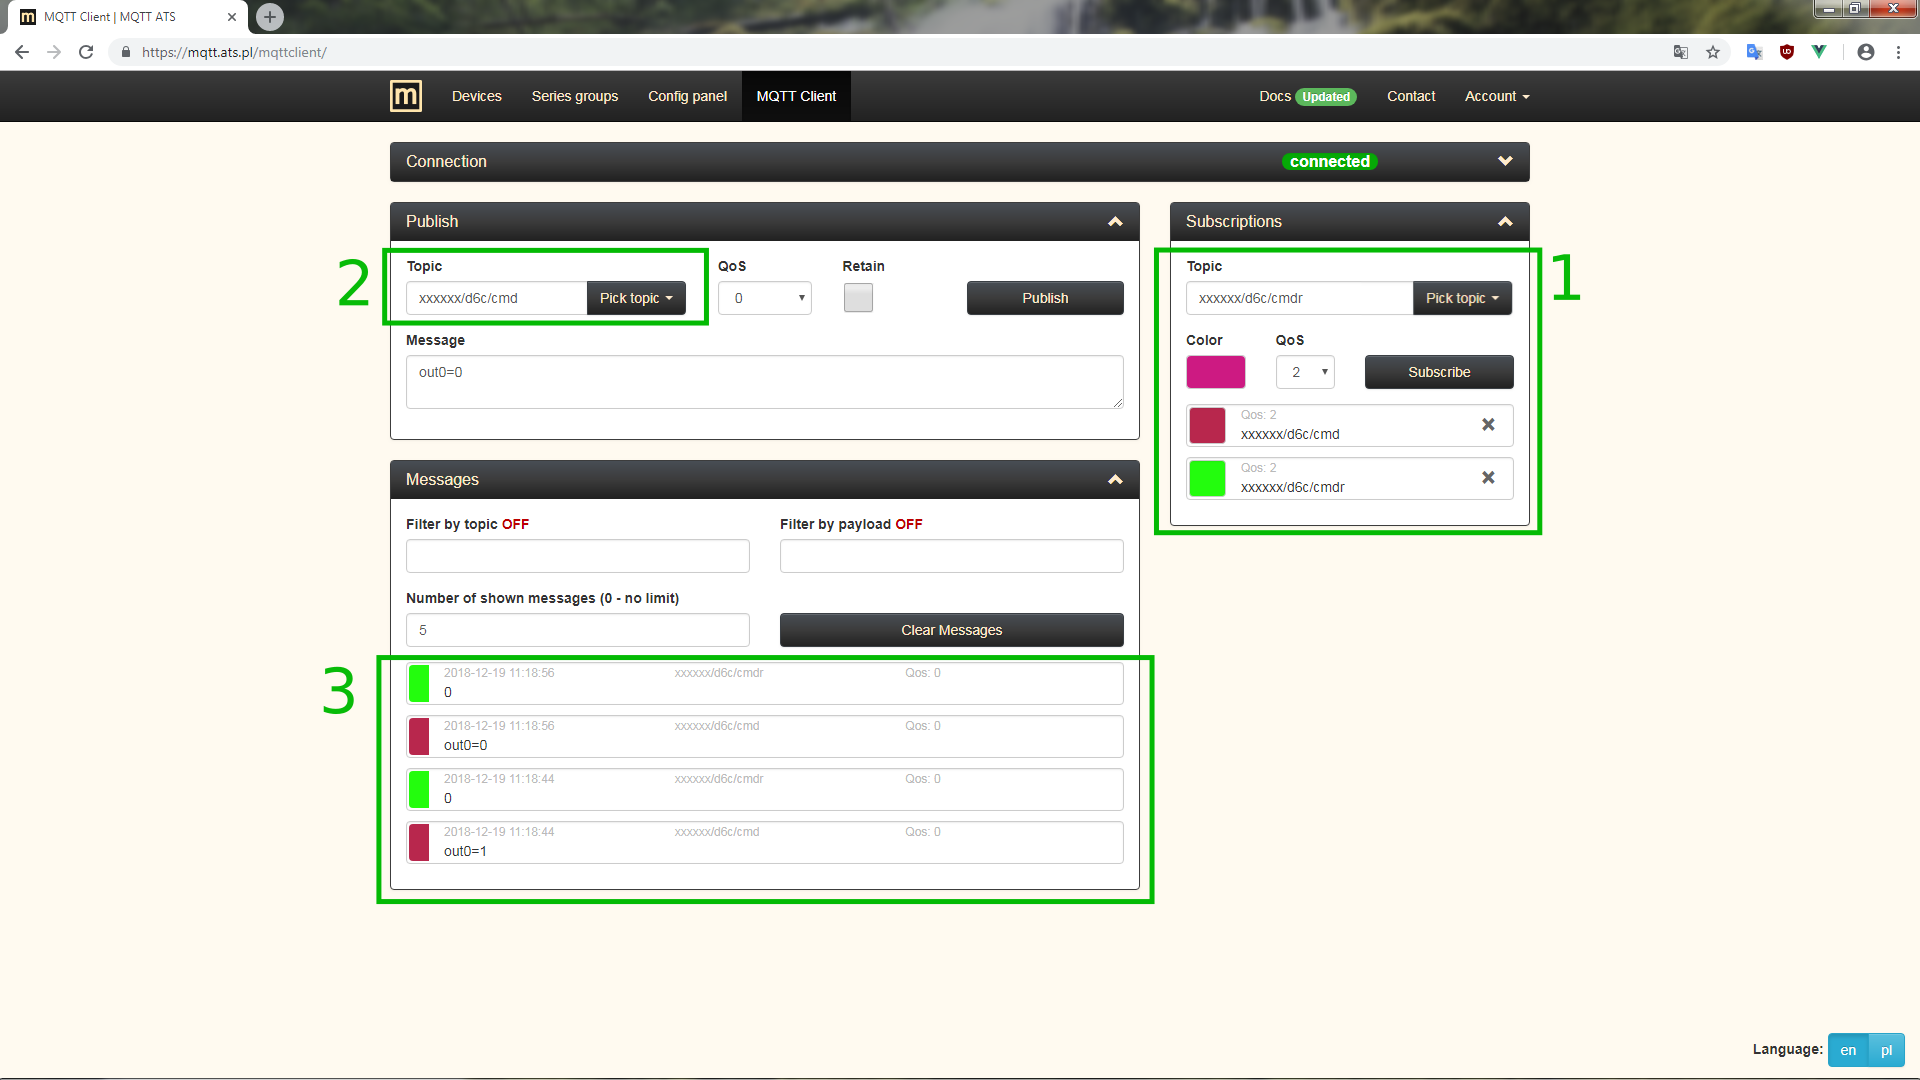
Sending command to LK3
Below you can find list of supported devices along with their topics and commands:
-
LK3 (ver 1.49)
- command's topic - ends with /cmd
- command's result topic - ends with /cmdr
- commands:
- turn output on - outX=1, where X is output, eg. 0 or 1
- turn output off - outX=0, where X is output
- turn pwm output on - pwmX=1, where X is pwm output, eg. 0 or 1
- turn pwm output off - pwmX=0, where X is pwm output
- set pwm frequency - pwmfX=Y, where X is pwm group (0 - pwm 0, 1 - pwm 1-3), Y is frequency in Hz
- set pwm duty cycle - pwmdX=Y, where X is pwm output, Y is duty cycle in percents (integers 0-100)
-
WR-01 (Sonoff-Basic module)
- command's topic - ends with /cmnd/power
- command's result topic - ends with /POWER
- commands:
- turn output on - 1, on, ON
- turn output off - 0, off, OFF
- toggle output - toggle, TOGGLE
Series groups
There is option to aggregate your device's series into groups (called series group), which can then be viewed together in chart or table view.
When you create device, it will also have its own dedicated series group to which you then add series (select them as active). It's used in chart and table views to display only chosen series.
Apart from these special series groups you can create custom ones, which can contain series from multiple devices. They are best used to group chosen series for easier viewing on chart and table, or to group certain series across multiple devices for comparing purposes. Note that custom series groups aren't tied with devices so they can be deleted freely, without affecting the devices.
Series names
In case of custom series group you might need to change series' names after creating new group with series, that happen to have the same names. It's necessary for chart view that every serie has distinct name, otherwise data won't be displayed properly.
Series groups page
Series groups page is quite simple and very similar to Devices page. There is list of series groups, form to add new ones, group of links to edition pages just like in Devices page.
The few differences between Series groups page and Devices page are listed below (including editing pages):- There is no device type and prefix in list.
- There is no links to Quick Configuration and Manage databases pages in Edit section.
- There is no need to select active series in group - once added they are active, but cannot be changed.
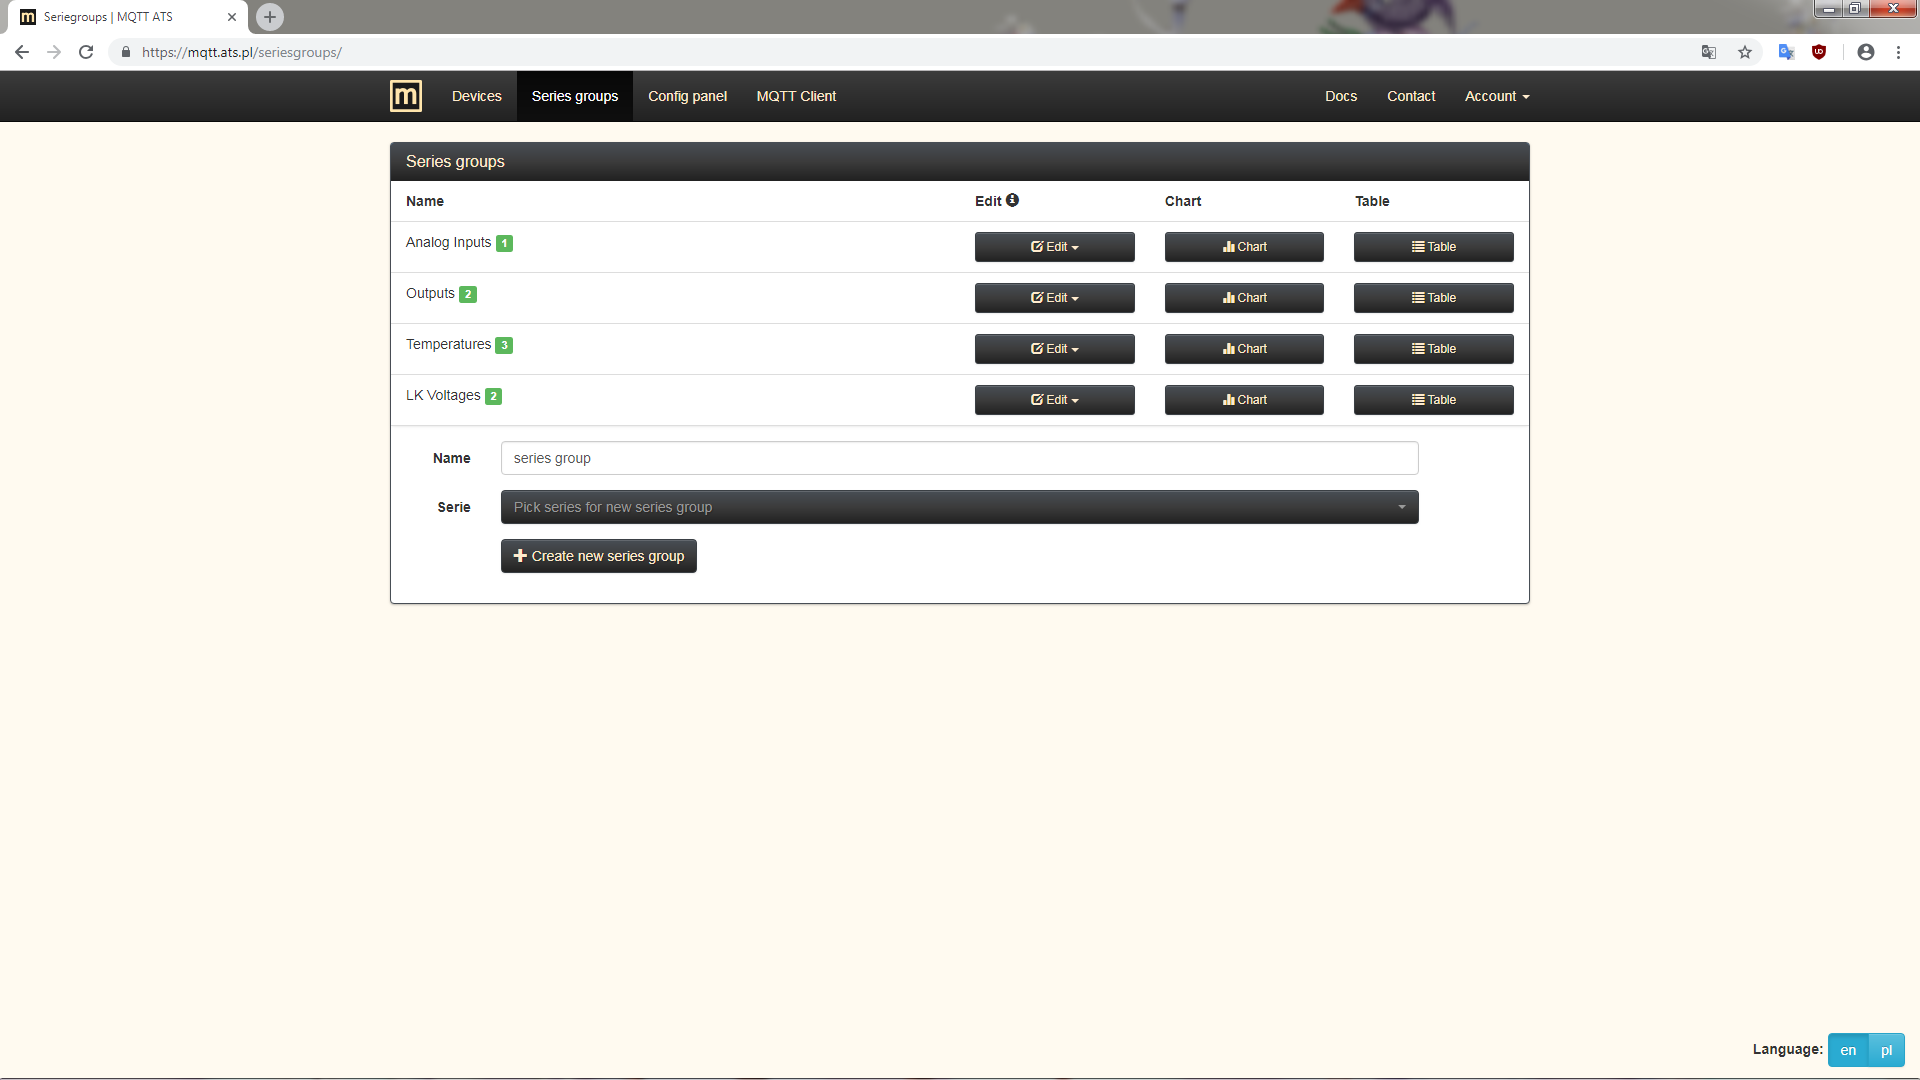
Series groups page
Viewing data
There are two pages available for viewing data from devices - chart and table views. These views can be accessed via links in Devices and Series groups pages.
Both of views queries databases to get data for series assigned to groups. Then they put it respectively on the chart or in the table. In case of the former one (chart) it will also listen for incoming messages over MQTT.
It is necessary to select some series as active for device. Otherwise chart and table views won't work and also links pointing to them will be disabled.
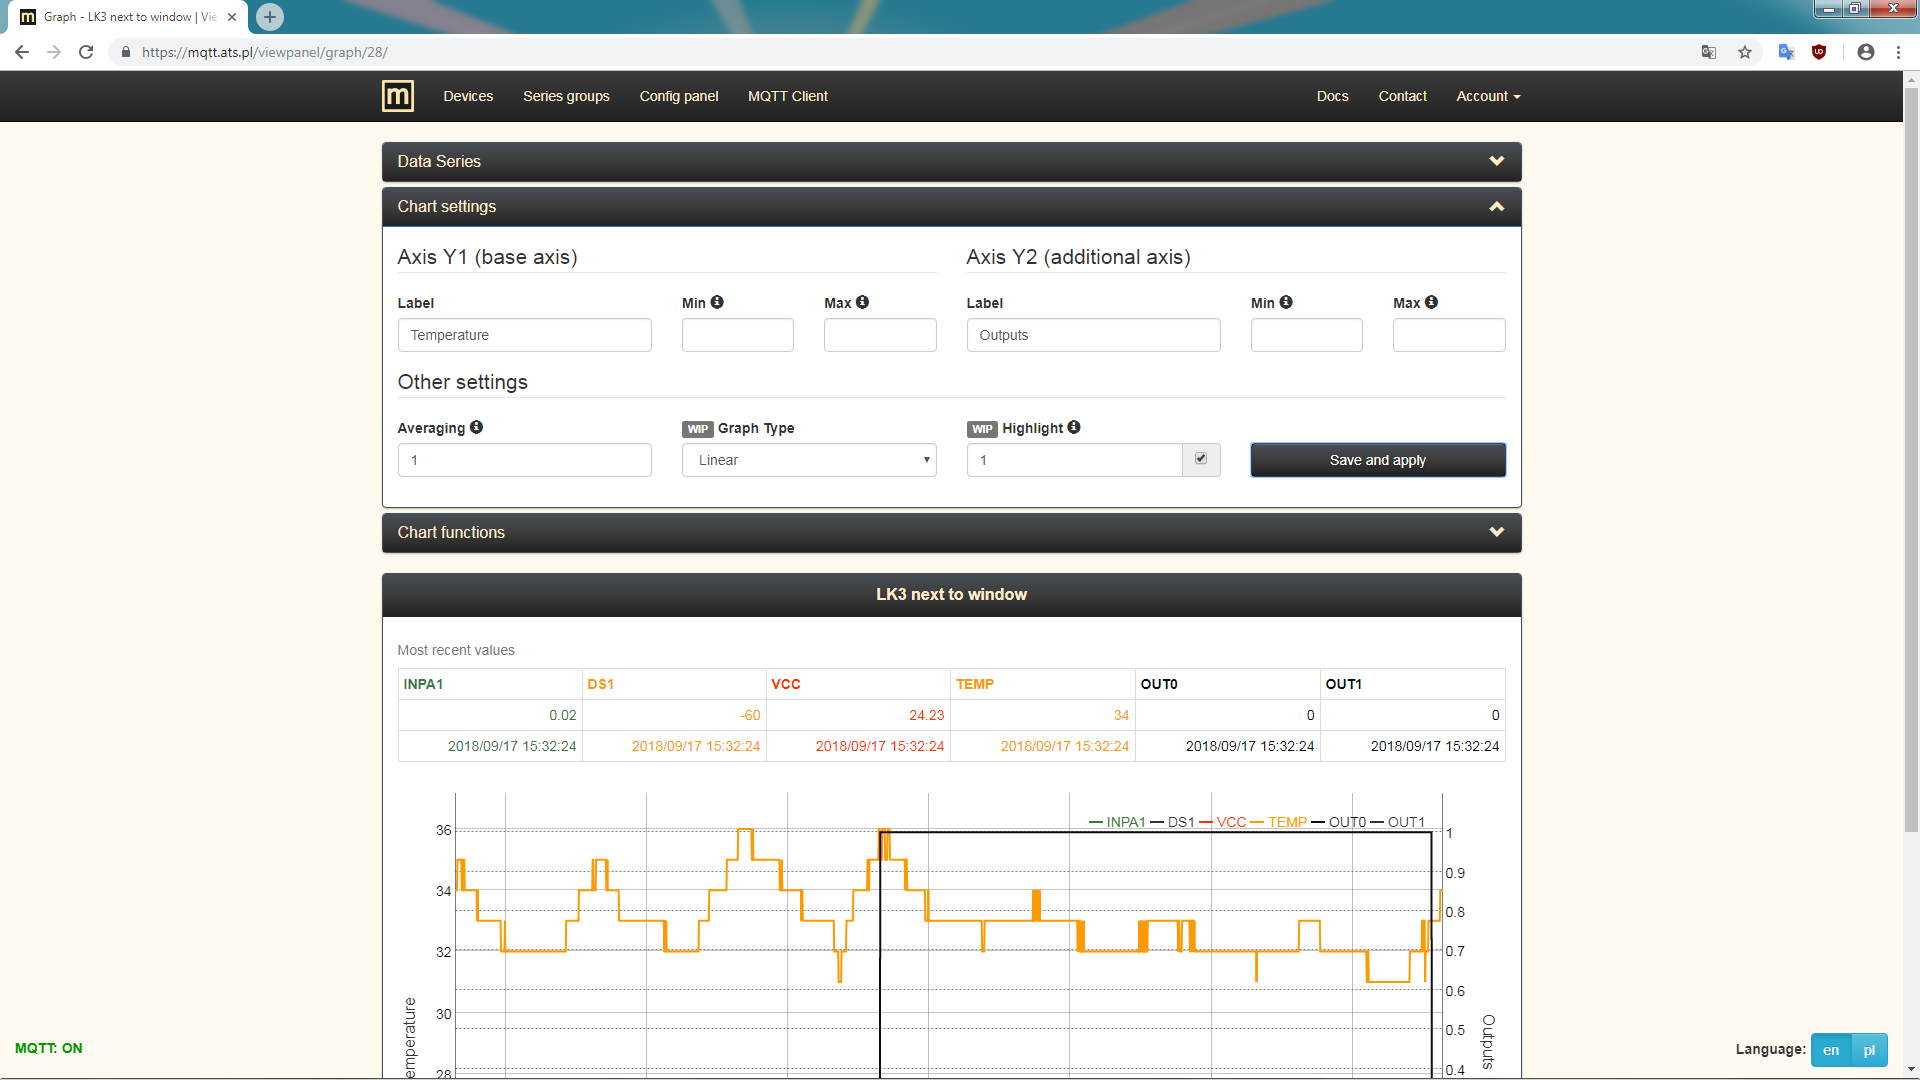
Chart
There are few parts of Chart page that should be distinguished.
- Table with most recent values. When chart view is opened it will be updated with data from incoming MQTT messages.
- Actual chart on which series are plotted. In upper right corner there is legend with values of the series at data points closest to the cursor. In lower part there is roller that allows choosing visible range.
- MQTT connection status.

Chart view - full
There are also expandable sections:
- Data Series - Table of series with options related to their appearance on chart (axis - one of two, color, fill under series line, linewidth, data point size, function button to show/hide series on chart). Image of this section.
- Chart settings - Options that affect whole chart, like axis labels, axis ranges, averaging, highlighting of series on hover. Image of this section.
- Chart functions - Find minimum and maximum for series, show data from chosen period, download chart as image or CSV file with date in ISO-8601 format YYYY-MM-DDTHH:mm:ss.sssZ (can be only used when data was read from databases, not via MQTT). Image of this section.
Table
In the centre of Table page there is said table with date and series values. There also are few other parts that should be distinguished.
- Download data in form of CSV file. There are few options of how date is formatted in file.
- Search field which scans dates and series values that can be used to filter results. You can also quickly choose which series should be visible.
- Navigation line where you can choose number of displayed results on page and move across pages.
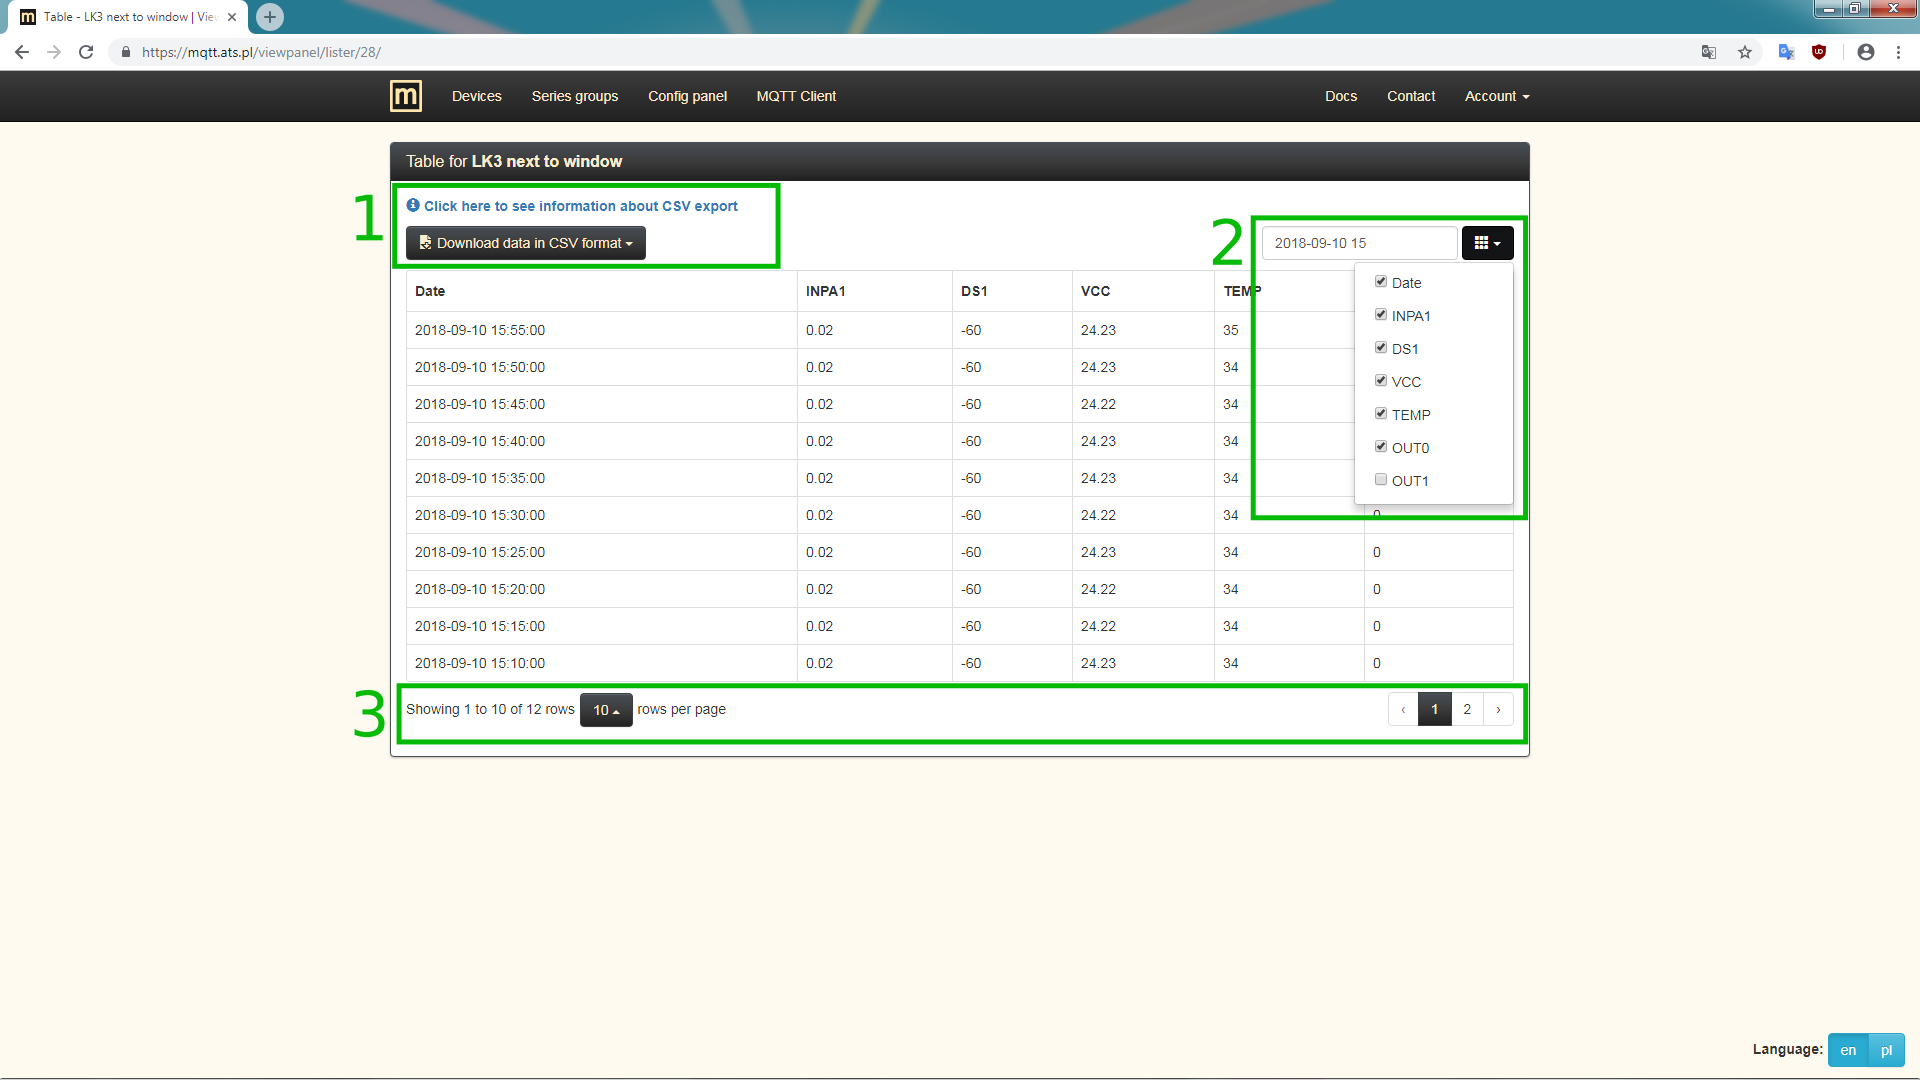
Table view
Config panel
The Config panel allows you to configure reactions (very similar to events in LK3) and tasks (similar to the scheduler on LK3).
Basically, there are 4 sections on Config panel page:
- Buttons for saving and discarding changes. If there are some changes they will be enabled (can be clicked). Above these buttons you will find alerts about unsaved changes, status of configuration save and errors in configuration.
- A service panel in which you can add, edit and list service configurations.
- A reaction panel in which you can add, edit and list reactions.
- A task panel where you can add, edit and list tasks.
Sections of services, reactions, tasks are very similar visually - there is counter showing their count, button to open form for adding new, list of positions with their details and buttons to edit or delete them.
Saving changes
There is a message displayed when there are unsaved changes, so you won't forget about it and lose your changes. However it's recommended to save after batch of changes, not single ones, or in other words do in once you have finished applying changes (to actually lose them you would have to close Config panel tab in browser).
Services
Service configurations are the basis of Config panel, because they are required to create reactions and therefore are important for tasks (task can trigger reactions). Service configuration defines basic options for service, eg. for smtp (email) it defines address to which send message.
Currently there are few supported services:
- smtp - send email (for now only account used to register the account can be notified)
- mqttpub - send MQTT message (can be used to control LK3)
- thingspeak - send message to update thingspeak's channel
Adding service
Adding or configuring service is nothing more but giving common name to let's say sending email to your email address or sending MQTT message to LK3 command topic. The goal behind it is to have pool of "actions" that can be used in reactions, where you will define the actual message to send or under what conditions it should happen, but more about it in reactions section.
Form for adding a new service configurations is shown on the picture below. There are 3 fields:
- Name of configuration, can contain letters, digits and _. It has to be unique, that is you can't have two service configurations with the same name. It might be a good idea to choose descriptive name, that will let you easily distinguish configurations, eg. mymailnotification for sending email to own email address. In other parts of Config panel, name will be visible in pairs with the name of the service.
- Name of service/function you can use with short description of it. List of supported services will be extended later on.
- Value is essential part of configuration of service, for example smtp's value is email address to notify, mqttpub's value is MQTT publish topic. Field differs depening on chosen service, eg. for mqttpub it is a text input and a dropdown list of topics associated with your devices.

Config panel - adding a service configuration
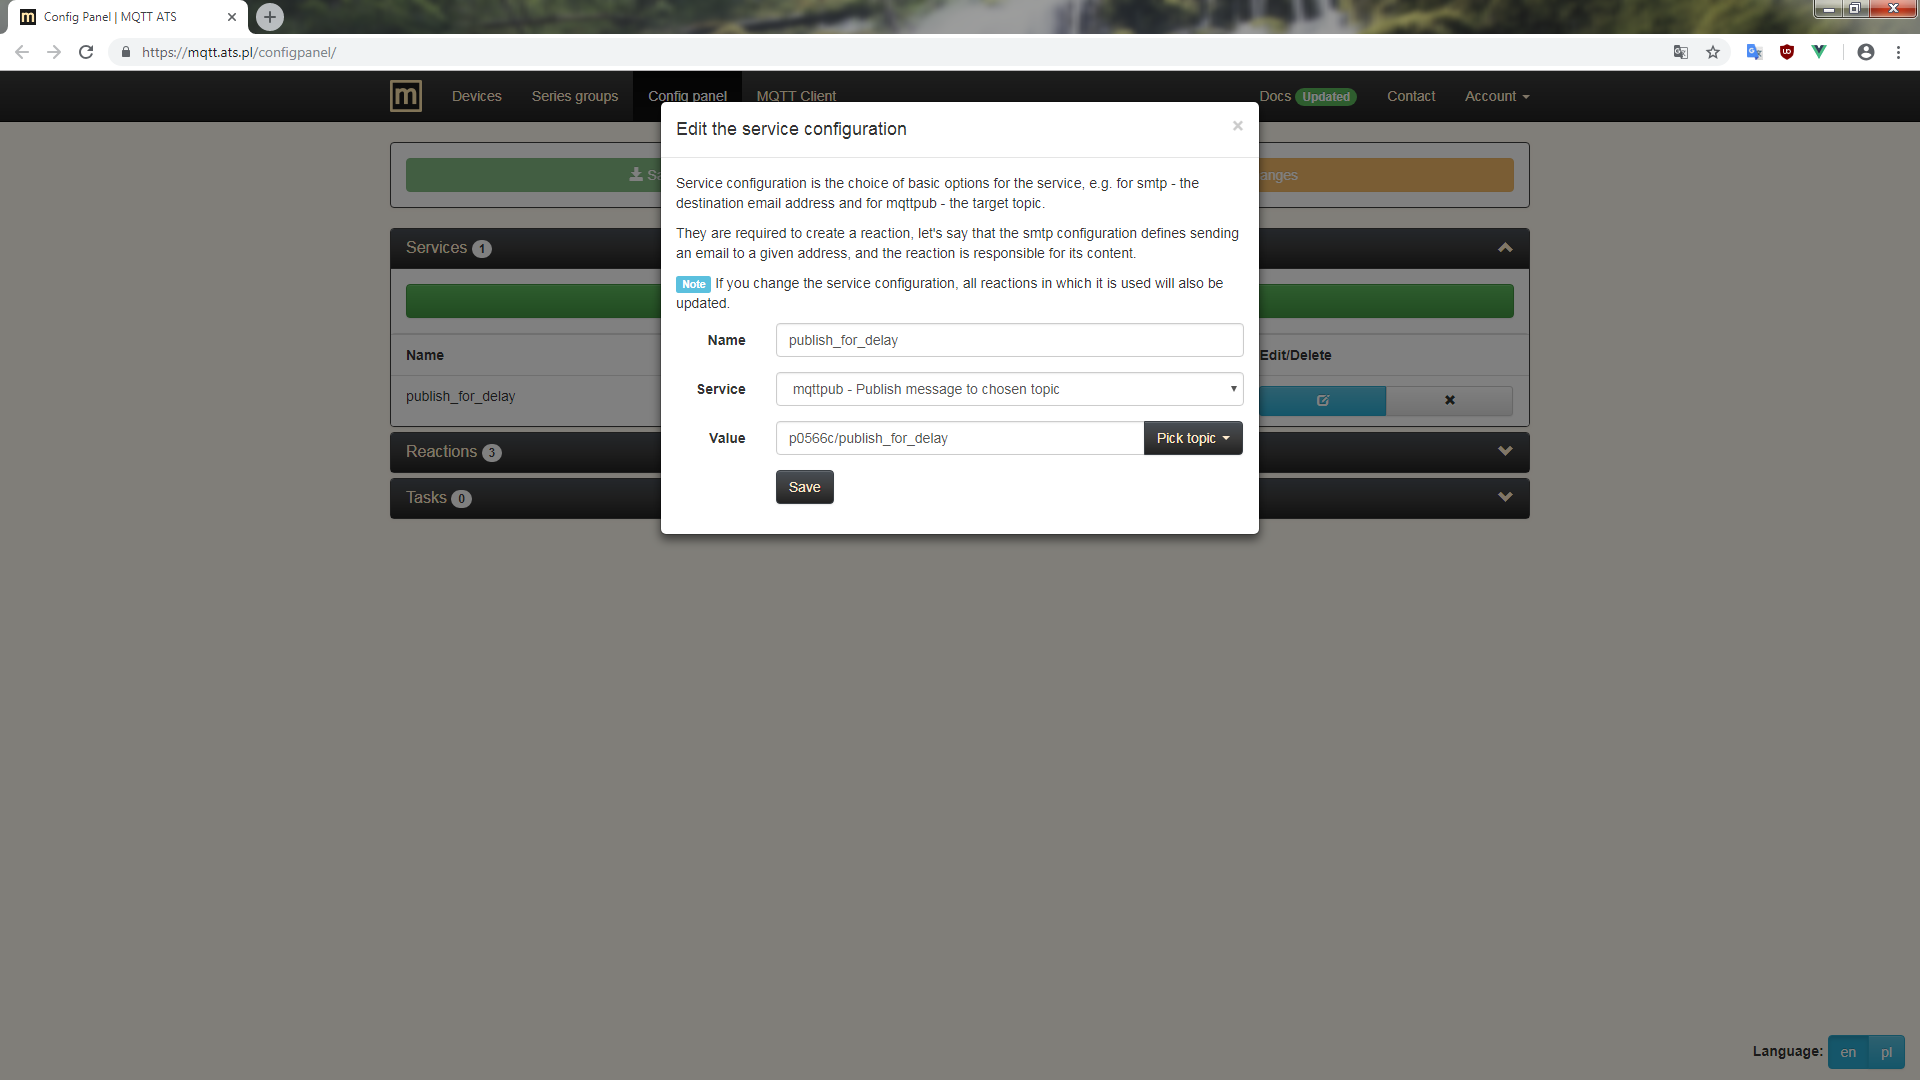
Config panel - editing a service configuration
Services list
List of configured services with their details and buttons for editing or deleting. There are 4 columns:
- Name of configuration.
- Name of service for which this configuration is.
- Value, which depending on the service displays email address (for smtp), MQTT topic (for mqttpub).
- Buttons to edit and delete service configuration. Note that these actions can affect reactions in which service is used. In case of deletion there will appear information which reactions will be changed or even deleted, but editing will update related reactions silently.
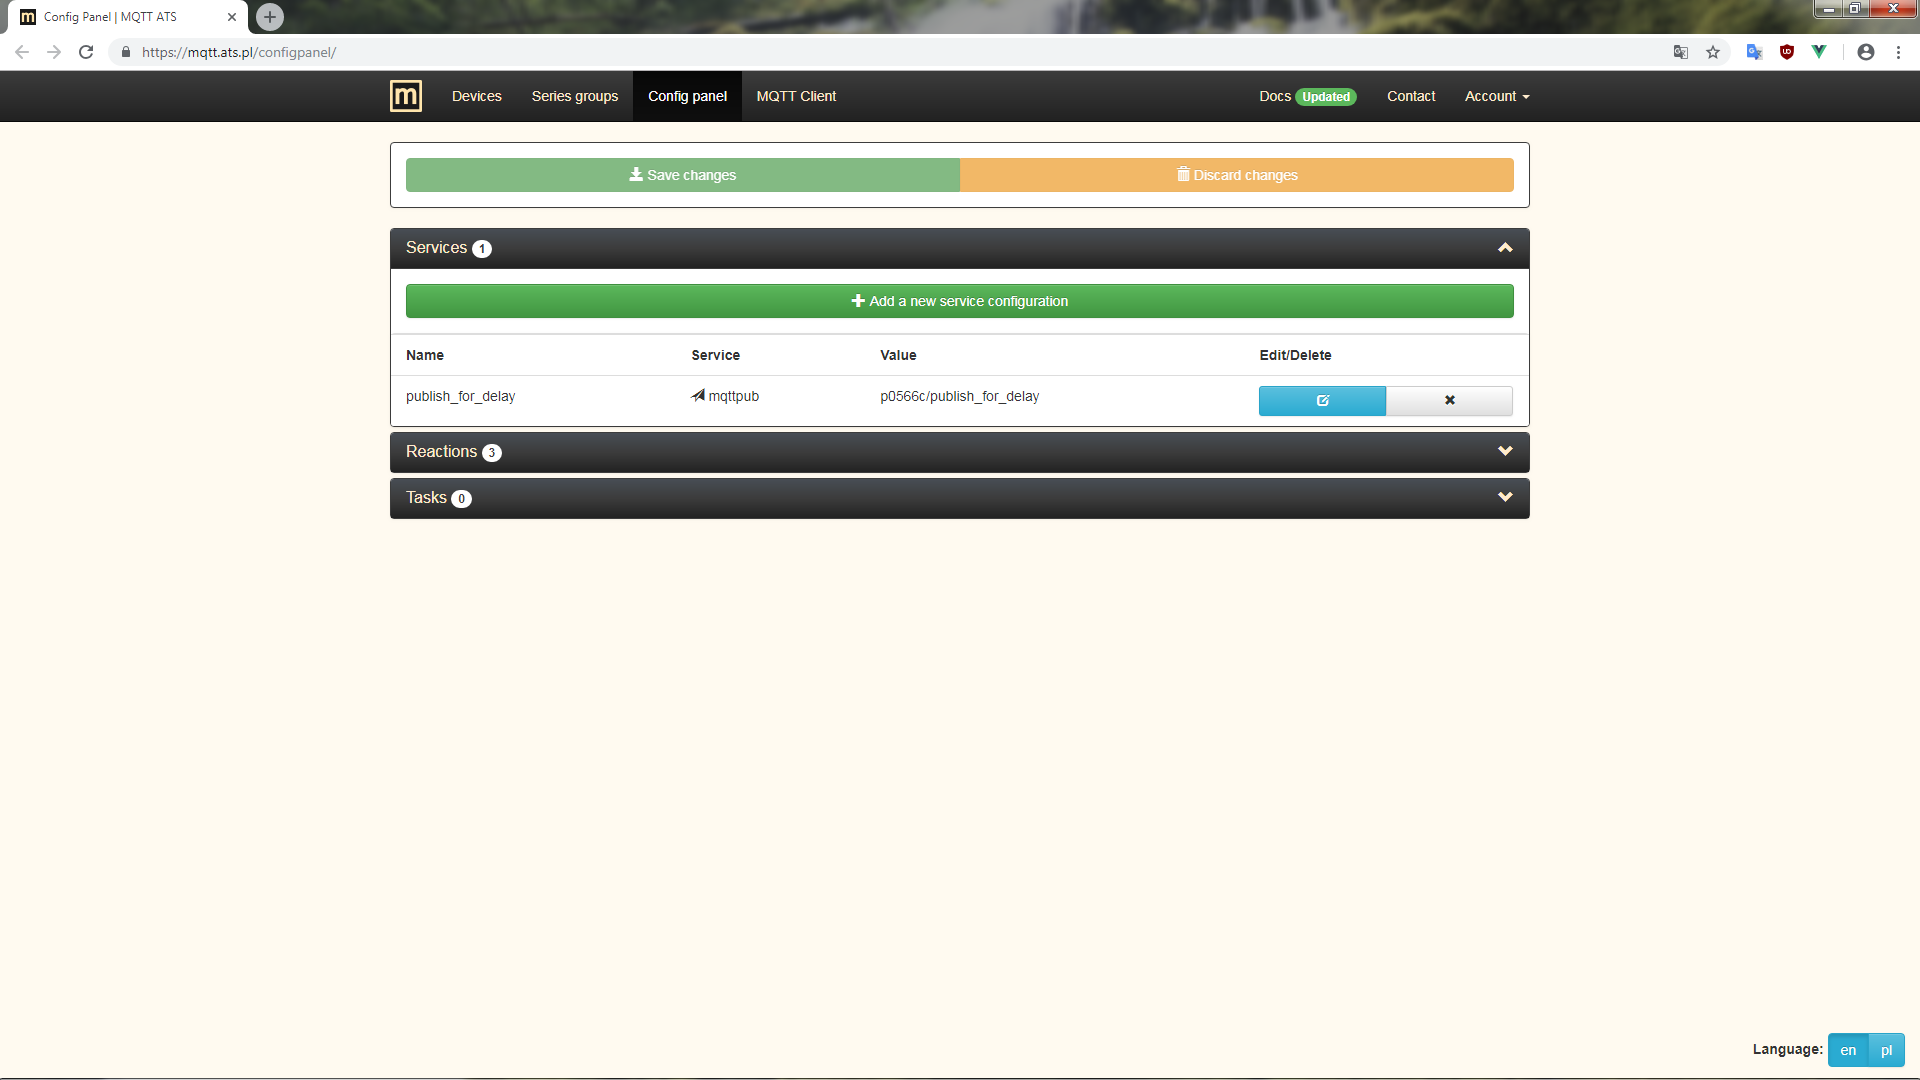
Config panel - list of service configurations
Reactions
Reactions are actions to be performed in response to an incoming MQTT message on a specific topic (e.g. from a device). The actions to be performed are defined by service configurations. There are also modifiers, such as a filter or format, that can affect the time and manner of action.
Filter
Very important part of reaction is filter, because it allows to take action based on message content, not only the fact that there was a message on specific topic. For now there are two filters that can work on numeric values, eg. sensor reading, out status. They compare received value with the one given in reaction setup, and if the result of comparison is true it will pass message to actions, else it will not take further actions.
Currently available are following filters:
- Basic - performs simple mathematical comparison of received numeric value with given static value.
- Advanced - performs two mathematical comparison and then logical conjunction or disjunction of comparison's results.
Format
Format allows to overwrite received message's text before it is passed to services for processing, but after it was checked by filter. You can use special tags {topic} and {payload} in format, so they will be replaced in message with actual topic on which message was received and message's content respectively. Thanks to that you can send more human-like message via email by wrapping sensor reading into full sentence.
Let's say for example, a format with the following content:
The temperature in living room is {payload} from DS sensor on topic {topic}
Then on the associated topic dev1/temp arrives message 25, and format changes it to:
The temperature in living room is 25 from DS sensor on topic dev1/temp
Adding reactions
Form for adding new reaction is shown on the picture below. There are 5 fields:
- Name of reaction, can contain letters, digits and _, and has to be unique among reactions.
- MQTT subscription topic that will be source of messages to process by filter, format and services.
- Filter type and its configuration. Fields for entering configuration appear when filter is chosen, they include reference values, comparison operators and logical operator.
- Format is a text that will overwrite original message before passing it to service (more about it above). It's optional.
- Select which actions (services) should be taken if filter result is True (always True when not used). The list is populated with your configured services, so make sure you have at least one, otherwise you won't be able to set reaction.
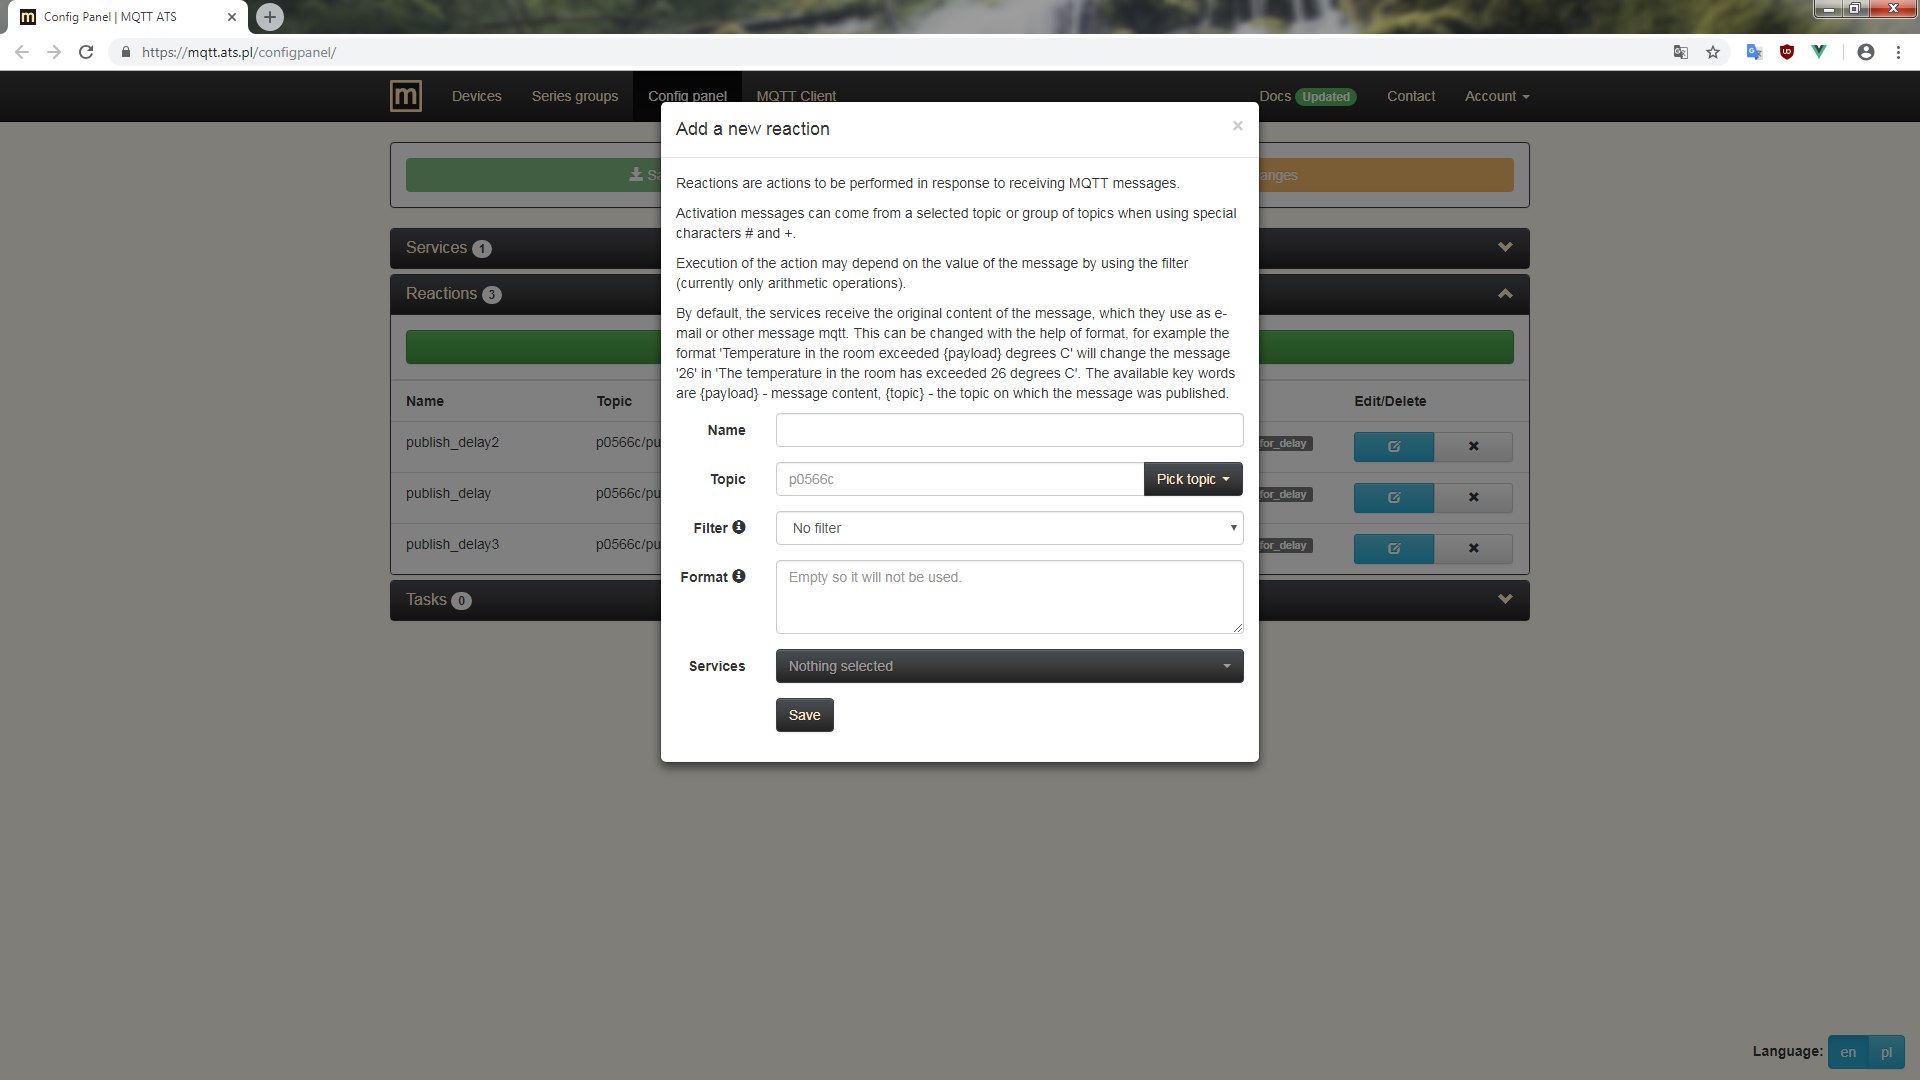
Config panel - adding reaction

Config panel - editing a reaction
Reactions list
List of reactions with their details and buttons for editing or deleting. There are 6 columns:
- Name of reaction.
- Topic from which messages will be processed.
- Filter configuration (operators and reference values or empty if not set).
- Text of format (empty if not set).
- Services that will be run for received (or formatted) message. They are displayed in pairs, that is service name tied with your custom configuration name.
- Buttons to edit and delete reaction.
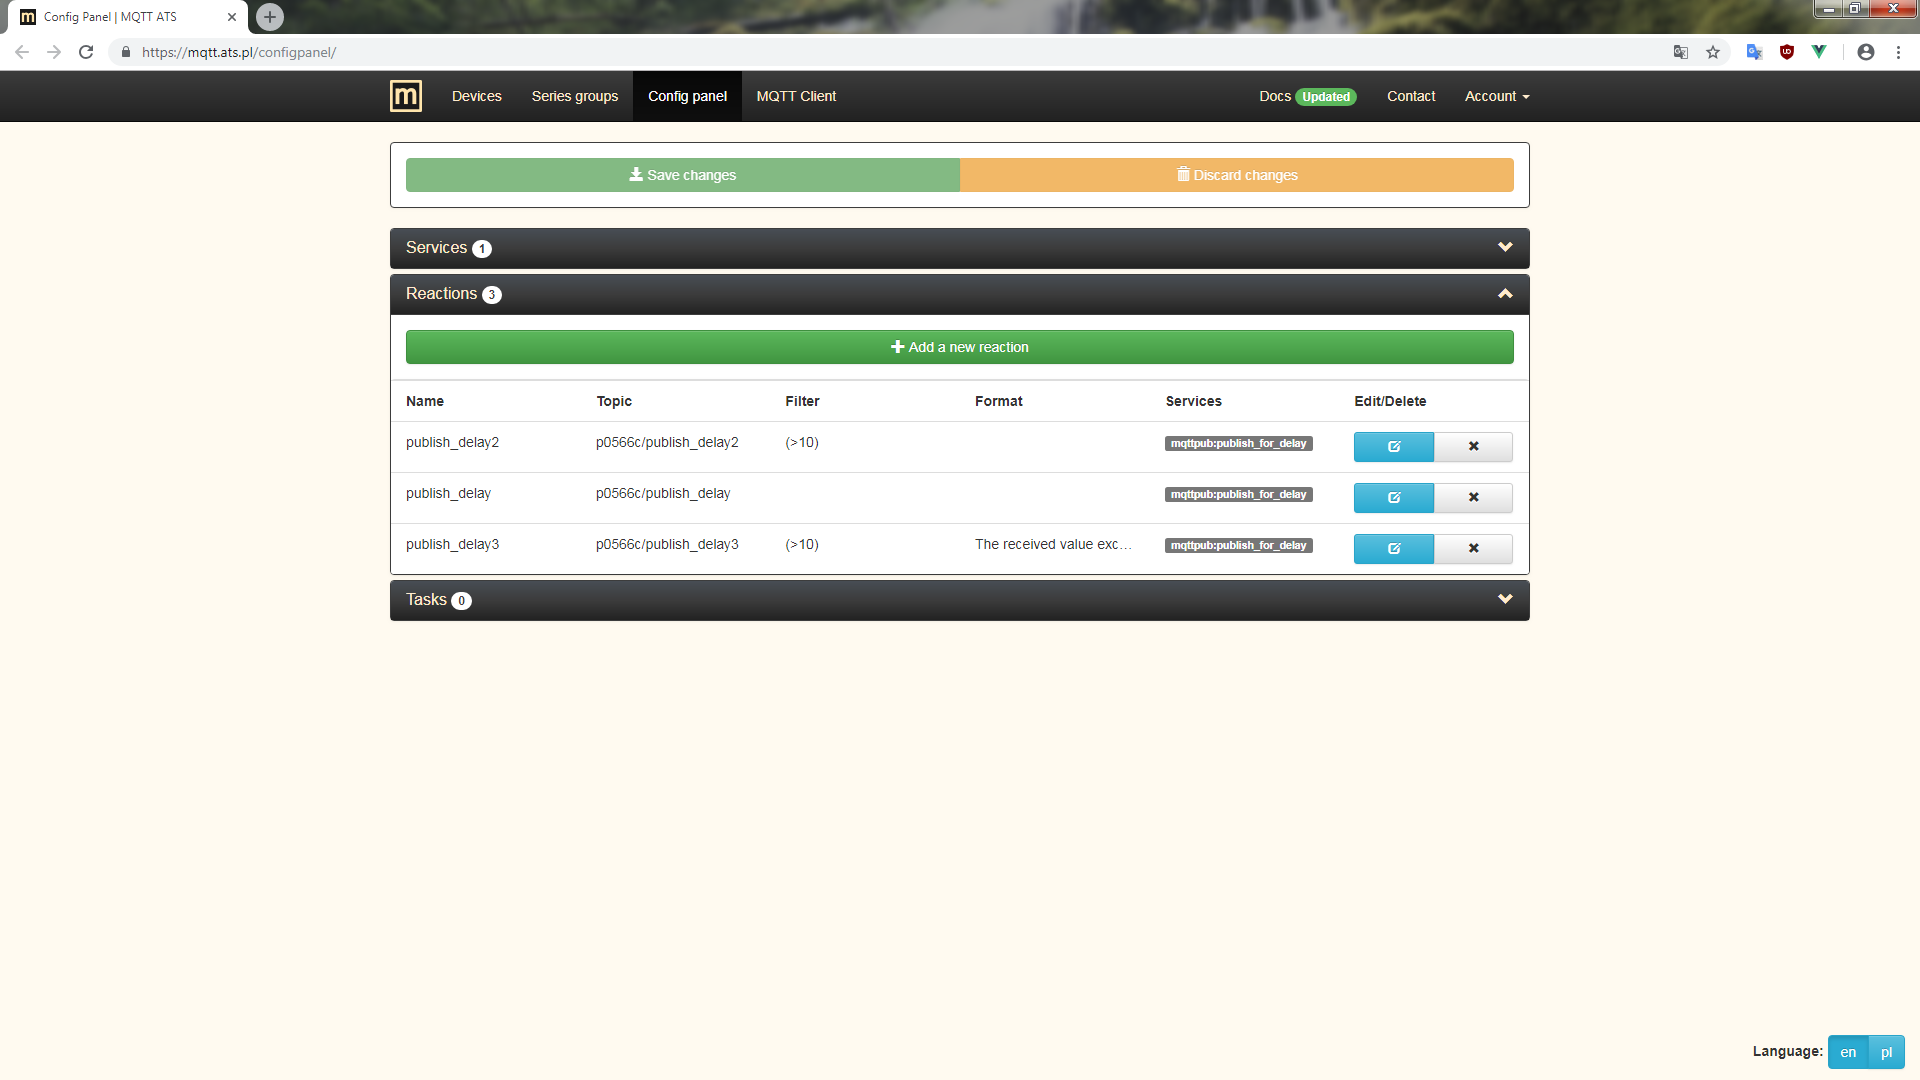
Config panel - list of reactions
Tasks
Tasks consist in sending MQTT messages to specific topics at specified times, in a periodic manner. Therefore, they act as mqttpub service themselves, but when paired with reactions they can perform more functions (any attached to reaction, eg. send email).
Adding task
Form for adding a new task is shown on the picture below. There are 4 fields:
- Name of task, can contain letters, digits and _, and has to be unique among tasks.
- MQTT publish topic to which message will be published. Next to the input field there is a dropdown list with command topics for your devices and reactions. Note that reaction topic can include special characters (# or + used in MQTT subscriptions), which cannot be used in publish topic, therefore you will have to replace them after picking from list.
- Times when message should be sent. At least one position has to be defined.
- Message to send. Note that if message is sent to topic that has filter or format configured, this message will be processed by them.

Config panel - adding task

Config panel - editing a task
Tasks list
List of tasks with their details and buttons for editing or deleting. There are 5 columns:
- Name of task.
- Topic to which message should be send.
- When the message should be send.
- Text of message to send.
- Buttons to edit or delete task.

Config panel - list of tasks
MQTT client
MQTT Client page embbeds user's MQTT client for connecting with server using WebSockets. You can use this page for testing your devices, for controlling them or something else. Connection to server is created right as you open this page, with use of your personal MQTT client credentials, so there is no setup required.
Page
Below is description of MQTT client page.
- Connection panel where you can configure MQTT client (defaults to the user's client on our server and is handled automatically, so in normal use you don't need to care about it). There is also visible connection status.
- Subscriptions panel where you can subscribe to topics and see those already subscribed. There is also shown modal with form for adding new subscriptions. QoS is described in Mosquitto documentation.
- Publish panel where you can send MQTT messages on chosen topic. QoS and Retain are described in Mosquitto documentation.
- Messages panel where you can see messages published to topics you subscribed. In upper part there are fields for filtering messages by topic and/or payload, field for limiting the number of displayed messages and clearing them.
- List displayed when you click on Pick topic button (next to Topic field in Publish and Subscriptions sections). It contains all topics for your devices with few special ones to make publishing/subscribing easier.

MQTT client page
Software used
In this section you will find what software has been used in the project and where to find more about them. There also is note about licenses.
MQTT WebSockets Client library
It is a MQTT client implementation in JavaScript that uses WebSockets to connect to the MQTT broker by the browser. It is used in chart view and Config panel to receive incoming messages and send messages. You can find more about this library and other MQTT client implementations at Paho website.
About license:
          * Copyright (c) 2013 IBM Corp.
          *
          * All rights reserved. This program and the accompanying materials
          * are made available under the terms of the Eclipse Public License v1.0
          * and Eclipse Distribution License v1.0 which accompany this distribution.
          *
          * The Eclipse Public License is available at
          *    http://www.eclipse.org/legal/epl-v10.html
          * and the Eclipse Distribution License is available at
          *   http://www.eclipse.org/org/documents/edl-v10.php.
          *
          * Contributors:
          *    Andrew Banks - initial API and implementation and initial documentation
HiveMQ WebSockets Client
It links JS MQTT client with user interface (that is created in HTML/CSS) and also provides wrapper functions for connecting to server, subscribing, publishing and others. It has been used as a template that has been modified to suit our needs. You can find more about it and their enterprise MQTT broker at HiveMQ website.
About license:
          * Copyright 2013 dc-square GmbH
          *
          * Licensed under the Apache License, Version 2.0 (the "License");
          * you may not use this file except in compliance with the License.
          * You may obtain a copy of the License at
          *
          * http://www.apache.org/licenses/LICENSE-2.0
          *
          * Unless required by applicable law or agreed to in writing, software
          * distributed under the License is distributed on an "AS IS" BASIS,
          * WITHOUT WARRANTIES OR CONDITIONS OF ANY KIND, either express or implied.
          * See the License for the specific language governing permissions and
          * limitations under the License.
          *
          * @author: Christoph Schäbel
Mosquitto MQTT Broker
Mosquitto is an open source (EPL/EDL licensed) message broker that implements the MQTT protocol version 3.1 and 3.1.1. With its extensive, but flexible configuration it is great solution for use in this project (WebSockets support, multiple listeners, user-based access, access limitation to topics). You can find more about Mosquitto broker at Mosquitto website.
About license:
          * The Eclipse Public License is available at
          *    http://www.eclipse.org/legal/epl-v10.html
          * and the Eclipse Distribution License is available at
          *   http://www.eclipse.org/org/documents/edl-v10.php
Dygraphs
Dygraphs is JS charting library that can handle huge data sets. It is used to create charts in chart view and Config panel. You can find more about it at Dygraphs website.
About license:
@license Copyright 2014 Dan Vanderkam (danvdk@gmail.com) MIT-licensed (http://opensource.org/licenses/MIT)
mqttwarn
mqttwarn is program that subscribes to any number of MQTT topics and informs one or more services. You can find more about it at JP Mens GitHub repository.
About license:
Eclipse Public License – v 1.0 (http://www.eclipse.org/legal/epl-v10.html)